

 By
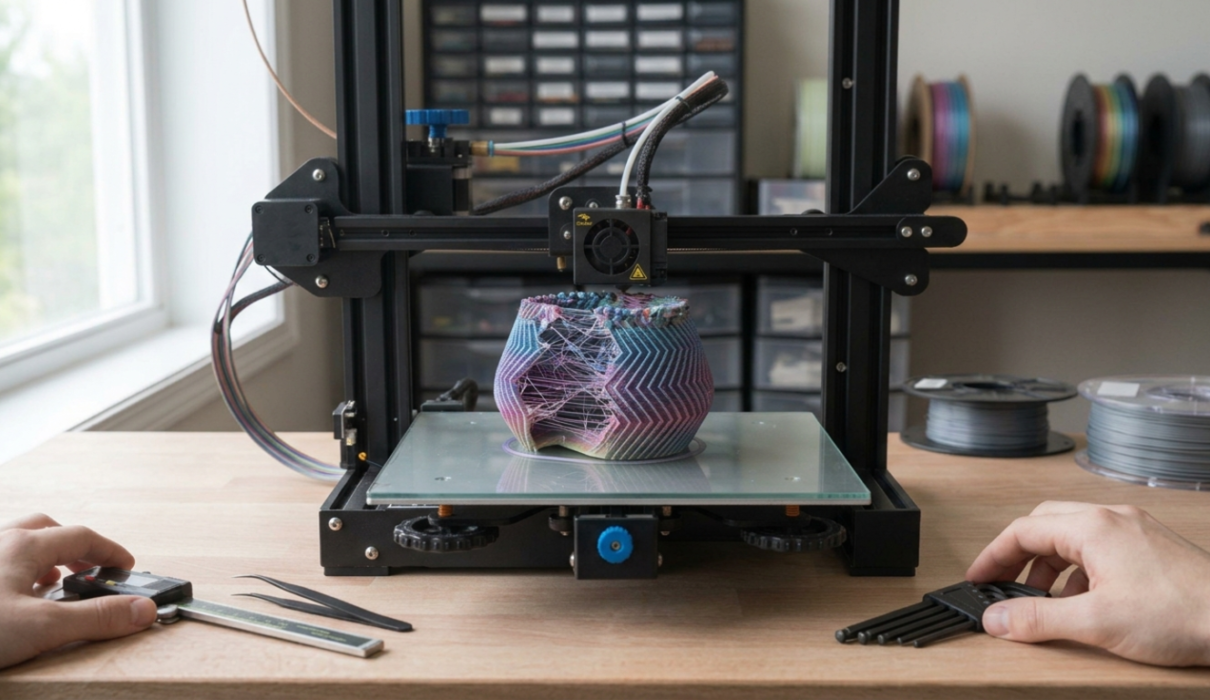
By A print can look completely fine for the first twenty minutes and still turn into a stringy, warped mess by the time it finishes. That gap between “this is going great” and “what happened here” is where most people start searching for help with common 3D printing problems, and it’s worth saying upfront: almost none of these failures come down to one single cause. A bad print is usually the result of two or three small 3D printing problems lining up at once — a slightly dirty bed plus a nozzle running a touch hot plus a filament that’s absorbed more moisture than it should have.
That’s part of why randomly changing settings rarely fixes anything. Bump the temperature, adjust retraction, tweak the flow rate, and reprint — and if the problem was actually a loose belt or a warped build plate, none of that helps.
A lot of common 3D printing problems actually start at the first layer, which makes sense once you think about it. Everything else in a print builds on that first pass, so a slightly-off first layer doesn’t just look bad — it can set up failures that don’t show up until hours later.
This guide walks through how to diagnose 3D printing problems, starting with the first layer, moving through the most frequent print failures, and ending with a practical process for troubleshooting instead of guessing.
What Are the Most Common 3D Printing Problems?
Before touching any settings, it helps to actually name what you’re seeing. Is the print not sticking to the bed at all, or is it sticking and then lifting at the corners? Vague troubleshooting — “my print looks bad” — leads to vague fixes. Specific symptoms point to specific causes.
The most frequent 3D printer problems cluster around a handful of areas: the first layer failing to adhere or looking uneven, stringing between features, warping as parts cool, layer shifting mid-print, under- or over-extrusion, and general print quality issues like rough surfaces or poor bridging. These common 3D printing problems are worth learning to recognize because the visible symptom often points toward the underlying cause.
3D Printing First Layer Problems
The first layer matters more than any other single layer in a print, because it’s simultaneously your adhesion foundation and your first real feedback on whether the printer is actually calibrated. If you’ve ever watched a print fail two hours in over something that traces back to the first few minutes, you already know how much this early stage matters.
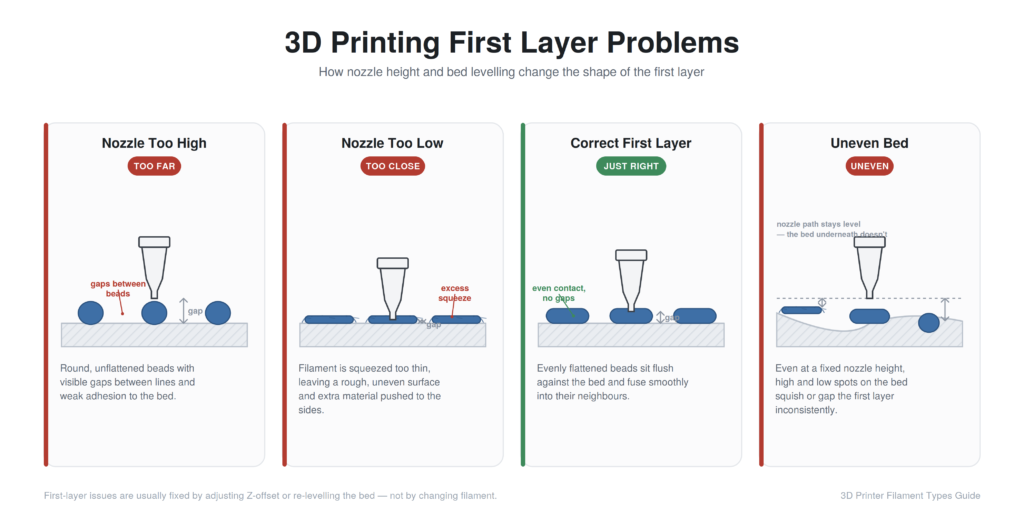
First layer not sticking usually means the nozzle is too far from the bed, the bed isn’t at the right temperature, or the surface is dirty or contaminated with oils from handling. The plastic touches down but never bonds, often dragging along behind the nozzle.
First layer too squished happens when the nozzle sits too close to the bed. The plastic gets pressed thin — sometimes thin enough to see gaps or a scraped texture — and the nozzle may audibly struggle as it moves.
First layer too high is the opposite: the nozzle sits too far away, so extruded lines don’t flatten properly. They look rounded and stringy rather than flat, with visible gaps between adjacent lines.
Uneven first layer, where one part looks perfect and another too high or too low, almost always points to a bed that isn’t level or, more precisely, isn’t trammed — the surface may be level but not parallel to the gantry’s movement plane.
Elephant’s foot, where the bottom edge bulges outward slightly, comes from the first few layers being squished more than they should, often from a Z-offset that’s a bit too aggressive or a bed too hot for the material.
First layer gaps, small visible spaces between extruded lines, usually mean the nozzle is slightly too far away or flow is a touch low for that first layer.
And when first layer 3D printing problems trace back to bed leveling, it’s often not a one-time issue — a bed that was level last week can shift from a bumped table, a loosened screw, or normal wear over time.
3D Printer First Layer Problems: What to Actually Check
Beyond the visual symptoms, several concrete things cause 3D printer first layer problems, each leaving a slightly different fingerprint.
An incorrect Z-offset is probably the single most common cause of first-layer 3D printing problems, and the symptom tells you which direction to adjust: too close produces scraping and thin, see-through lines; too far produces rounded, poorly-adhered beads. There’s no universal “correct” Z-offset here — it depends on your nozzle, bed surface, and printer.
Bed leveling (or a proper mesh/tram) needs to be genuinely current, not just “done once.” A dirty build plate creates weak spots in adhesion that can look random until you clean the surface. Incorrect bed temperature shows up as poor adhesion if too low, or a print that’s almost too sticky to remove if too high.
Incorrect nozzle temperature during the first layer affects bonding — too cold and it doesn’t flow smoothly, too hot and it can ooze more than intended. Poor surface preparation is easy to overlook if a print starts failing after months of reliable use. Excessive first-layer speed doesn’t give plastic enough time to bond, which is why most slicers default to a slower first-layer speed.
Incorrect first-layer height changes how extruded plastic behaves against the bed independent of Z-offset. A warped build plate can measure level at a few points but not be flat everywhere, showing up as inconsistent adhesion across the same print. And inconsistent extrusion during the first layer — from a partial clog or under-tightened extruder gear — can make an otherwise well-calibrated setup produce a patchy first layer anyway.
Common 3D Printing Problems and How to Diagnose Them
Once you’re past the first layer, a handful of other 3D printing problems account for most of what goes wrong. Here’s how to recognize each issue and what’s causing it.
Stringing — thin wisps of plastic connecting separate parts of a model — usually comes from retraction that isn’t pulling back enough filament during travel, nozzle temperature a bit too high, or moisture in the filament. Longer travel moves across open gaps make it more visible even when settings are only slightly off.
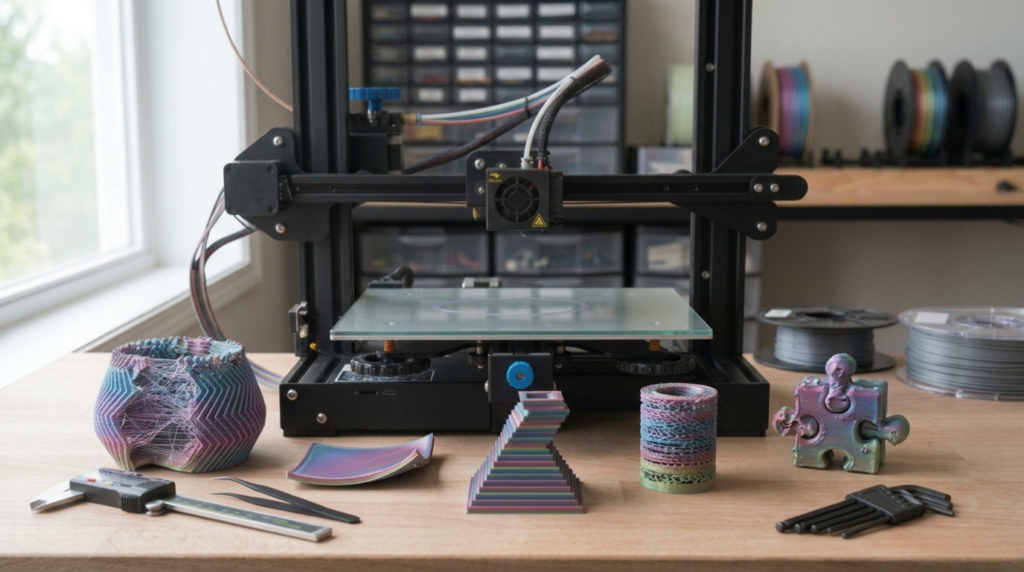
Warping happens when a print cools unevenly and shrinks more in some areas than others, pulling corners off the bed. It’s most common with materials that shrink more as they cool, like ABS, and worsens with poor bed adhesion, big temperature swings, or the lack of an enclosure for materials that need one.
Layer shifting, where an entire layer appears to move sideways mid-print, is almost always mechanical: a loose belt, something obstructing the print head, acceleration pushed higher than the frame can handle, or in rarer cases a stepper motor issue. A shift is usually sudden and consistent from that point forward.
Under-extrusion — thin walls, gaps in surfaces that should be solid, weak bonding — often traces to a partially clogged nozzle, incorrect flow settings, an extruder not gripping filament properly, or nozzle temperature too low.
Over-extrusion looks like the opposite: excess material bulging along edges, oversized dimensions, sometimes a rougher finish. This can stem from flow set too high, an incorrect filament diameter setting, or a genuinely oversized batch of filament.
Blobs and zits — small bumps, often near a print’s seam — usually relate to retraction and pressure changes at the nozzle, particularly after a travel move or at each layer’s start/stop point.
Poor bridging, where a print sags across a gap, comes from insufficient cooling, print speed too fast to solidify in time, temperature a bit high for the span, or a bridge longer than the settings can reasonably handle without support.
Layer separation, where a print splits along a layer line, points to insufficient bonding — often nozzle temperature too low, cooling too aggressive, or a filament that doesn’t bond as strongly under the conditions used.
Weak or brittle prints can stem from low infill, too few perimeter walls, poor layer adhesion from temperature issues, an inherently brittle material choice, or moisture-degraded filament.
Failed supports usually come down to support density too sparse for the geometry, a support interface that bonds too strongly or too weakly, poor model orientation creating unnecessary overhang, or bed adhesion issues affecting the support structure itself.
Nozzle clogging is another common source of 3D printing problems and can result from debris in the filament, incorrect temperature, moisture causing steam pockets, residue from a previous filament, or heat creep — where filament softens too early inside the cooling zone above the nozzle.
Print not starting correctly — failed first extrusion, missed the bed, filament not feeding — usually traces to bed leveling, Z-offset, a blocked nozzle tip, improperly loaded filament, or a slicer configuration mismatch.
3D Printer Problems vs. 3D Print Problems
It’s worth drawing a real distinction here, since the two get blamed on each other constantly. A 3D printer problem is something wrong with the machine itself — a loose belt, a worn nozzle, a malfunctioning thermistor, a stepper motor issue. A 3D print problem is often something upstream of the hardware: incorrect slicer settings, wet filament, a poorly prepared bed, wrong model orientation, or an inappropriate nozzle temperature.
What makes diagnosing 3D printing problems confusing is that both can produce similar-looking failures. Stringing might look like a hardware issue but usually isn’t. Layer shifting looks like a settings issue but usually is mechanical. The habit worth building: does the problem show up consistently across different filaments and models (more likely a printer problem), or does it seem tied to one specific material, model, or recent settings change (more likely a print problem)?
How to Troubleshoot a Failed 3D Print
The temptation after a bad print is to change several things at once when troubleshooting 3D printing problems — bump the temperature, adjust retraction, tweak cooling — and hope something sticks. That makes it almost impossible to know what actually fixed anything, so the same problem tends to resurface later without a clear cause.
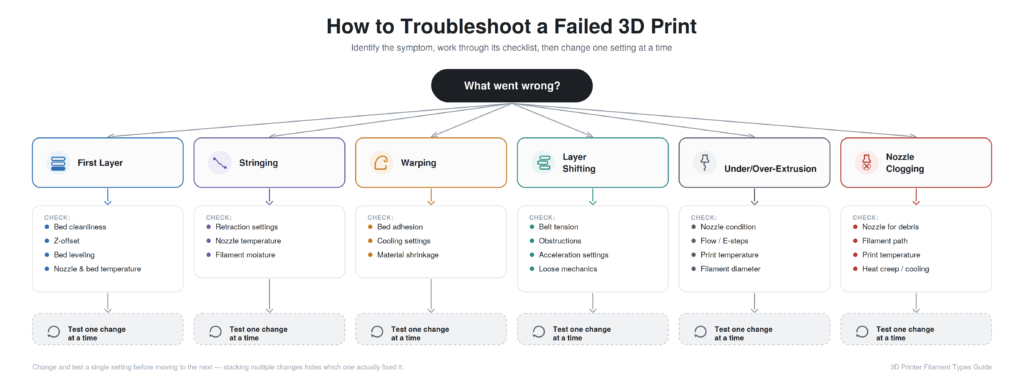
A more useful sequence: identify exactly where the failure begins. Check the first layer specifically, since so many downstream problems trace back there. Check the filament — has it been sitting out, does it feel brittle, is it fresh or old. Check nozzle temperature against the manufacturer’s recommended range. Check bed temperature the same way. Check mechanical components — belts, screws, anything loose or worn. Review slicer settings relevant to the specific failure rather than everything at once. Reprint a small test model rather than committing a full print to an unverified fix. And change one major variable at a time between attempts, so whatever happens next actually tells you something.
This works because it isolates variables instead of stacking them, which makes recurring 3D printing problems much easier to diagnose. It’s slower than guessing, but it’s the difference between actually understanding your printer and just hoping the next attempt goes better.
A useful rule is to troubleshoot from the bottom up. Start with the first layer, then check extrusion, temperature, cooling, movement, and finally slicer settings. This prevents you from changing advanced settings when the real problem is something as simple as poor bed adhesion.
Filament-Related 3D Printing Problems
Filament itself causes more 3D printing problems than people initially assume, and it’s easy to blame the printer when the real issue is sitting on the spool.
Moisture is a big one — many filaments absorb ambient humidity over time, and trapped moisture turns to steam inside a hot nozzle, causing popping sounds, stringing, and a rougher finish. Inconsistent diameter, more common with lower-quality filament, throws off extrusion in ways that are hard to diagnose. Brittle or old filament, especially PLA that’s absorbed moisture over months, can snap during feeding or extrude unevenly.
Incorrect material temperature — printing PETG at PLA temperatures, for instance — produces poor results regardless of how well-calibrated everything else is. Incompatible material choices for a printer’s hardware cause failures that look like settings problems but are really mismatches. Poor storage compounds all of this over time.
Different materials also behave differently by nature. PLA is generally one of the easier common filaments to work with, although it can still absorb moisture and develop print-quality problems when stored improperly. PETG strings more easily and absorbs moisture faster. ABS and ASA need more attention to enclosure and ventilation. TPU’s flexibility makes it prone to different jamming issues. Nylon is dramatically more hygroscopic and essentially requires proper drying to print reliably. None is universally “the best” — they just fail differently when something’s off.
| Product | Type | Best For | Key Feature | check price |
|---|---|---|---|---|
| PLA Filament | PLA | Beginners & Models | Easy printing | Check Price |
| PETG Filament | PETG | Functional Parts | Tough & durable | Check Price |
| TPU Filament | TPU | Flexible Parts | Flexible & impact-resistant | Check Price |
| ASA Filament | ASA | Outdoor Parts | UV resistant | Check Price |
| Hardened Steel Nozzle | Accessory | Abrasive Filaments | Wear resistant | Check Price |
| Filament Dryer | Accessory | Nylon/PETG/PVA | Moisture control | Check Price |
Affiliate Disclosure: This post contains affiliate links. If you purchase a product through these links, we may earn a small commission at no extra cost to you. Our recommendations are based on product relevance and usefulness to readers.
Temperature Problems
nozzle temperature too high tends to cause more stringing, visible under-extrusion, and a rough, inconsistent surface, since the plastic isn’t flowing or bonding the way it should. Nozzle temperature too high tends to cause more stringing, blobs, excessive oozing during travel moves, and a loss of fine detail as the material becomes too fluid to hold sharp edges.
Bed temperature problems cut both ways too — too low and adhesion suffers, particularly at the first layer; too high for the material and you risk warping or an exaggerated elephant’s foot. Recommended temperatures vary meaningfully by brand and formulation, even within the same material category, so a manufacturer’s suggested range is a better starting point when troubleshooting 3D printing problems than a generic number pulled from somewhere else.
Bed Adhesion Problems
Bed adhesion problems are among the most common 3D printing problems and generally split into two very different complaints: the print won’t stick at all, or it sticks so aggressively that removing it risks damaging the part or the surface.
Prints that won’t stick usually point to a dirty build plate, an incorrect Z-offset, bed temperature too low, or a surface not well suited to that filament. Prints that stick too well often mean bed temperature is a bit high, the surface has too much texture or residue buildup, or the first layer was squished more than needed. Both problems get worse with excessive first-layer speed, and both can be affected by cooling — too much fan too early can affect adhesion on some materials, while too little causes other problems entirely.
Mechanical 3D Printer Problems
Mechanical issues are some of the most commonly overlooked causes of what looks like a software or filament-related 3D printing problem. Loose belts create shifting or ghosting that no slicer setting will fix. Loose screws, especially on frame joints, introduce wobble that shows up as inconsistent layer lines. Dirty rods or rails add resistance to smooth movement, subtly affecting print quality even without an obvious failure.
Incorrect gantry alignment, worn components like bearings or pulleys, extruder issues like a worn gear slipping on the filament, nozzle wear from abrasive materials, and cooling fan problems that leave certain areas under-cooled all fall into this category. The tricky part is these often look identical to a settings problem — inconsistent extrusion from a slipping extruder gear looks a lot like inconsistent extrusion from bad flow settings, which is exactly why checking mechanical components belongs in any real troubleshooting sequence.
Slicer-Related Problems
Slicer settings shape a huge portion of print outcomes, and understanding what a setting actually does before changing it can prevent many avoidable 3D printing problems and save a lot of trial and error. Wall count that’s too low produces weak parts regardless of material. Retraction settings that are off produce excessive stringing. Support settings that don’t match a model’s geometry produce poor supports and rough surfaces underneath. Speed and acceleration pushed beyond what a printer’s frame can handle cleanly produce ringing, ghosting, and poor overhangs.
Print time, surface quality, under-extrusion, and over-extrusion can all trace back to slicer configuration just as easily as to the printer or filament. The habit worth building: understand what a setting actually controls before adjusting it blindly, since two settings that sound similar can affect a print very differently.
Print Quality Problems
Beyond outright failures, plenty of prints “succeed” while still showing smaller 3D printing problems that affect the final appearance. Visible layer lines are largely a factor of layer height and nozzle size, and reducing them means a trade-off with print time. Ringing or ghosting — faint wavy patterns near sharp corners — comes from vibration during rapid direction changes, sometimes addressed through mechanical tightening or a printer’s input shaping feature if it has one.
Blobs, rough walls, and inconsistent surfaces are also common 3D printing problems that often circle back to the extrusion and temperature issues already covered. Poor overhangs and poor bridging point to cooling and speed. Missing fine details usually mean the nozzle size or layer height is too coarse for what the model needs. Uneven extrusion, when it’s not a clog, often traces to inconsistent filament diameter or an extruder gear not gripping consistently.
Beginner 3D Printing Problems
Beginners tend to run into the same handful of 3D printing problems repeatedly, and it’s worth knowing which are a normal part of learning and which might signal a hardware problem. Poor first layers, general bed adhesion struggles, picking the wrong temperature for a material, stringing, support-related headaches, awkward filament loading, occasional nozzle clogs, and using a mismatched slicer profile are all extremely common 3D printing problems early on and usually resolve with calibration and experience.
What’s less normal: a printer that consistently shifts layers regardless of settings, temperatures that fluctuate wildly instead of holding steady, or persistent bed leveling problems that come back within days. Those patterns lean more toward an actual hardware issue than a beginner learning curve.
First Layer Troubleshooting Checklist
Before starting any print where the first layer matters (essentially every print), it’s worth running through a quick mental checklist: is the bed clean, is bed temperature appropriate, is nozzle temperature appropriate, is Z-offset dialed in for this printer and bed combination, is the bed actually level or trammed rather than “probably fine,” is first-layer speed reasonable, is first-layer height set correctly for the nozzle size, does extrusion look consistent on the first few lines, and is the build plate itself in good condition. None of these has one universal correct value, but running through the list catches most first-layer problems before they become a failed print.
How to Prevent 3D Printing Problems
A handful of habits go a long way toward preventing repeat 3D printing problems. Keep filament dry and stored properly, especially for moisture-sensitive materials. Clean the build plate regularly rather than only when adhesion starts failing. Calibrate the printer after any significant change, not just when something breaks. Maintain belts and moving parts periodically instead of waiting for a shift to force the issue.
Inspect the nozzle occasionally for wear, especially after printing abrasive filaments. Use slicer profiles that actually match your printer and material rather than generic defaults. Run small test prints when trying something new rather than committing a large print to something unverified. Watch the first layer of every print rather than walking away immediately. And avoid changing multiple settings at once when something does go wrong, for all the reasons already covered.
When the Problem Is Actually the Printer
Some patterns point more toward genuine hardware trouble than settings or filament when diagnosing 3D printing problems: repeated layer shifting across different prints and materials, inconsistent extrusion that doesn’t correlate with any specific filament, bed leveling that won’t hold from one print to the next despite proper leveling each time, abnormal noises like grinding or clicking, temperature readings that fluctuate rather than holding steady, cooling fan failure noticeable as consistently poor overhangs, or general mechanical looseness you can feel when checking the frame.
The key distinguishing factor is consistency across variables. A problem tied to one specific filament or model is more likely a material or settings mismatch. A problem that persists across different filaments and models, even after reasonable adjustments, is a stronger signal that hardware needs attention.
3D Printing Problems Diagnostic Table
| Problem | What You See | Likely Causes | First Thing to Check |
|---|---|---|---|
| First layer not sticking | Plastic drags, won’t stay on bed | Wrong Z-offset, dirty bed, low bed temp | Clean the bed and recheck Z-offset |
| Stringing | Thin wisps between features | Retraction, temp too high, moisture | Retraction settings and filament dryness |
| Warping | Corners lift off the bed | Uneven cooling, poor adhesion, material shrinkage | Bed adhesion and ambient temperature |
| Under-extrusion | Thin walls, gaps in solid areas | Clogged nozzle, low flow, low temp | Nozzle for partial clogs |
| Over-extrusion | Bulging edges, oversized dimensions | Flow too high, wrong filament diameter setting | Slicer flow rate and filament diameter |
| Layer shifting | Layers offset sideways mid-print | Loose belt, obstruction, high acceleration | Belt tension and gantry movement |
| Nozzle clogging | Little to no extrusion | Debris, wrong temp, moisture, heat creep | Nozzle temperature and cold pull |
| Layer separation | Print splits along a layer line | Low temp, excess cooling, weak bonding | Nozzle temperature for that material |
| Blobs | Small bumps, usually near seams | Retraction, pressure changes | Retraction and seam settings |
| Poor bridging | Sagging across gaps | Insufficient cooling, speed too high | Cooling fan and bridge speed |
| Failed supports | Sagging or collapsed overhangs | Sparse density, poor orientation | Support density and model orientation |
| Elephant’s foot | Bulging at the base of a print | Z-offset too tight, bed too hot | Z-offset and bed temperature |
Frequently Asked Questions
What are the most common 3D printing problems?
First-layer adhesion issues, stringing, warping, layer shifting, and under- or over-extrusion account for the large majority of print failures people run into.
Why is my first layer not sticking?
Usually a combination of Z-offset being too high, bed temperature too low for the material, or a build plate that needs cleaning — check all three before assuming it’s one single cause.
What causes first layer 3D print problems specifically?
Most trace back to Z-offset, bed leveling accuracy, bed and nozzle temperature, or the physical condition of the build surface itself.
Why is my 3D printer stringing?
Retraction settings that aren’t pulling back enough filament, a nozzle temperature slightly too high for the material, or filament that’s absorbed moisture are the usual suspects.
Why does my 3D print warp?
Uneven cooling combined with material shrinkage as it cools, often made worse by poor bed adhesion or a lack of enclosure for materials that need one.
Why is my 3D printer under-extruding?
A partially clogged nozzle, incorrect flow settings, or a nozzle temperature too low for the filament to flow properly are the most common causes.
Why do my 3D prints have blobs?
Usually retraction and pressure changes at the nozzle, often more visible near a print’s seam where the nozzle starts and stops each layer.
Why does my 3D printer keep shifting layers?
This is almost always mechanical — a loose belt, something obstructing movement, or acceleration settings pushed higher than the frame can handle cleanly.
How do I fix common 3D printer problems without guessing?
Identify the specific symptom, check the first layer and filament condition first, change one variable at a time, and reprint a small test rather than a full model to confirm a fix actually worked.
Why do 3D printer first layer problems happen even on a calibrated printer?
Calibration can drift over time — a bumped bed, a loosened screw, or filament that’s changed since the last calibration can all reintroduce first-layer issues on a printer that was previously working fine.
You Might Also Like
- 3D Printing Innovations: What’s Actually Changing and Why It Matters
- How to Calibrate a 3D Printer: A Practical, No-Nonsense Guide
- Metal 3D Printer: A Practical Guide to How They Work, What They Cost, and Whether You Actually Need One
- Things to 3D Print: A Practical Guide to Useful, Fun, and Worthwhile Projects
- Creality Ender 3 V3: A Practical Look at Features, Specs, and Whether It’s Right for You
- 31 Best 3D Printed Fidget Toys & Fun Toys to Make
- 111 Best 3D Printed Animals to Make: Easy, Articulated & Fun Ideas
- 3D Printer Filament Types Guide
Conclusion
Most 3D printing problems are genuinely diagnosable once you separate the symptom from the guesswork and identify the underlying cause. The first layer sets the foundation for almost everything that follows, which is why so much of this guide circles back to it — a slightly-off Z-offset or an unclean bed doesn’t just cause a bad first layer, it can cascade into failures that don’t show up until much later in a print.
Identifying exactly what’s happening before changing settings, checking filament condition and mechanical components alongside software settings, and changing one variable at a time all matter more than any specific number or setting. Printer maintenance, proper filament storage, and understanding what your slicer settings actually do all reduce how often you run into 3D printing problems in the first place.
None of this makes troubleshooting instant. It gets easier with experience, mostly because you start recognizing patterns — this symptom usually means that cause — instead of starting from zero every time something goes wrong. That pattern recognition, more than any single fix, is really what separates someone who dreads a failed print from someone who just shrugs, checks the first layer, and tries again.