
My neighbor pulled up to his driveway one evening and his garage door just opened. No button. No app. Phone was in his pocket. I stood there watching like an idiot and then immediately texted him asking what was going on.
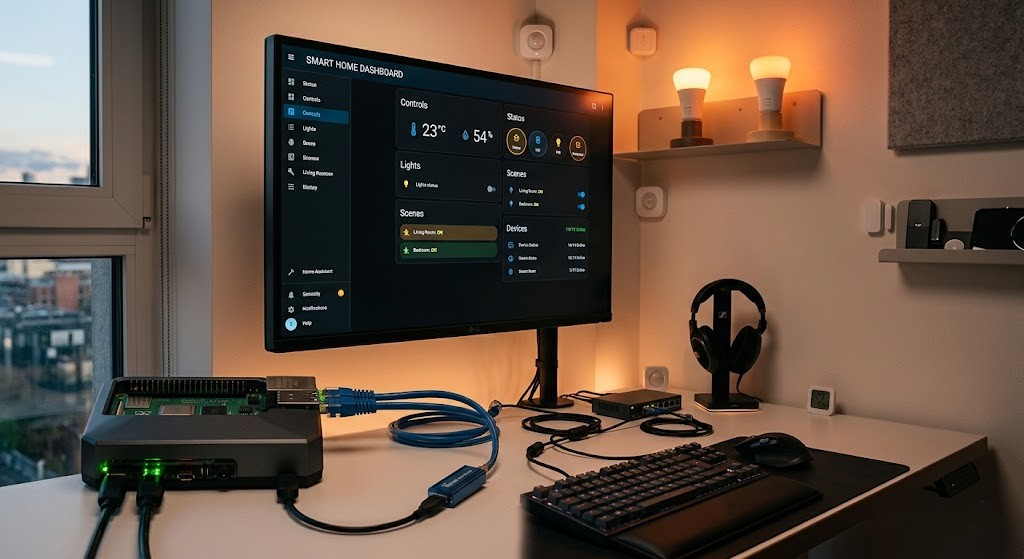
He gave me a 45-minute walkthrough. Home Assistant running on a Raspberry Pi 4, a handful of smart plugs, some Zigbee sensors, and what looked like a rat’s nest of ethernet cables in his utility room. I was completely hooked before he even got to the lights.
That was six months ago. I have since spent an embarrassing amount of time — and a surprisingly reasonable amount of money — building out my own raspberry pi home automation setup from scratch. Made a lot of mistakes. Also ended up with something I genuinely love using every single day.
This is what I actually learned about raspberry pi home automation. Not the marketing version. The real version, including the Saturday I lost my entire configuration.
What Raspberry Pi Home Automation Actually Is
Let me back up for anyone just arriving at this topic.
A Raspberry Pi is a small, cheap, credit-card-sized computer. Runs Linux. Uses very little power. You can leave it running 24/7 and barely notice it on your electricity bill. Costs somewhere between $35 and $80 depending on the model.
The automation part comes from software — most commonly Home Assistant. That software acts as a central brain for your house. Smart bulbs, thermostat, door sensors, cameras — they all report back to this one hub. And you can build automations that connect them in ways the individual manufacturer apps never would.
Your porch light turns on when your phone’s GPS shows you’re five minutes away. Coffee maker starts when your alarm goes off. Thermostat drops when the last person leaves home.
The concept isn’t new. Smart home hubs have existed for years. What makes raspberry pi home automation interesting is control. You’re not relying on some company’s cloud server. You’re not locked into one ecosystem. If a company shuts down or changes their app — and they do, they definitely do — your automations don’t break.
That matters more than people realize until it happens to them.
Why I Chose Pi Over a Commercial Hub
You can buy a SmartThings hub. Use Amazon Alexa or Google Home as your controller. Buy a Hubitat. Options exist that are more polished out of the box than running your own setup.
Here’s why I went with the Pi anyway.
Commercial options are fine until they’re not. SmartThings had rough years with cloud outages. Nest devices got bricked when Google decided to sunset an older product line. Wink — remember Wink? — started charging subscription fees overnight with almost no warning. People who’d bought into that ecosystem had to either pay up or start over completely.
Raspberry pi home automation with Home Assistant stores everything locally. Nothing goes through a cloud unless you explicitly set that up. If my internet goes down, my automations still work. If Home Assistant the company disappeared tomorrow — unlikely, it’s open source with a huge community — I’d still have a working system.
The tradeoff is setup complexity. Let’s be straight about that. It is more work. There’s a learning curve. If you want something that works in 20 minutes without touching a terminal, go buy a commercial hub. No judgment.
But if you’re reading a 2000-word blog post about this on a Tuesday night, you’re probably the kind of person who can handle it.
Hardware You Actually Need
Don’t overcomplicate this. I did, and it cost me two weeks. The beauty of raspberry pi home automation is that the starter hardware is genuinely cheap — you don’t need to spend hundreds before you know if you’ll even like it.
For most people starting out:
- Raspberry Pi 4 (2GB or 4GB — I have 4GB, probably overkill for basics)
- Quality MicroSD card — Samsung or SanDisk, at least 32GB, don’t cheap out
- Case with passive cooling or a small fan
- Official power supply, not some random USB charger
- Ethernet cable to connect to your router
That’s it to start. I bought a bunch of additional stuff in week one that I didn’t need until month three. Buy the basics, get it running, add hardware as you identify actual gaps.
The one upgrade I’d make if starting again: boot from an SSD instead of a MicroSD card. Cards fail. Mine failed after about four months and I lost my entire configuration. That was a bad Saturday morning. An external USB SSD is a $15-25 addition. Worth every cent.
Best Hardware for Raspberry Pi Home Automation
Disclosure: This article may contain affiliate links. If you buy through these links, I may earn a small commission at no extra cost to you.
| Component | Recommended Product | Why It’s Useful | CTA |
|---|---|---|---|
| Main Hub | Raspberry Pi 4 Model B | Perfect for Home Assistant setups | Check on Amazon |
| Storage | Samsung EVO 32GB MicroSD | Reliable storage for Pi OS | View Price |
| Better Storage | Crucial External SSD | Faster and safer than SD cards | Check Latest Deal |
| Zigbee Support | SONOFF Zigbee 3.0 Dongle | Best beginner Zigbee coordinator | Buy on Amazon |
| Smart Plug | TP-Link Kasa Smart Plug | Easy smart appliance control | See Details |
| Smart Bulb | Philips Hue Bulb | Reliable smart lighting | Check Availability |
| Door Sensor | Aqara Door Sensor | Great for automation triggers | View on Amazon |
| Cooling | Raspberry Pi Case with Fan | Keeps temperatures low | Check Price |
Setting Up Home Assistant — The Parts Nobody Explains Well
Installing Home Assistant on a Pi is easier than it used to be. Flash an image to your storage using Raspberry Pi Imager or Balena Etcher. Plug it in, wait a few minutes, navigate to homeassistant.local:8123 in your browser. First-time setup wizard appears.
Getting through the wizard is easy. What comes next requires patience.
Home Assistant uses integrations to connect devices. Hundreds of them — officially supported and community-built. Some are one-click easy. Philips Hue found itself automatically. Done in two minutes.
Others require digging. My older WiFi plugs needed a community integration. Getting them working meant reading through a GitHub thread from 2022, finding a comment from a guy named something like “pi_nerd_42” who’d figured out the right config YAML, and copying his approach. About 45 minutes. Not hard, just fiddly.
The Home Assistant community is genuinely good though. Reddit, their own forums, YouTube tutorials. If you hit a wall, someone has almost certainly hit the same wall and left breadcrumbs. I’d estimate I googled my way through about 60% of my setup just following threads other people had started.
Don’t be too proud to ask for help. The community doesn’t bite.
Zigbee vs WiFi vs Z-Wave
When I started reading about this, everyone had strong opinions and I had no idea what they were talking about.
Short version:
WiFi devices — easiest to start with, cheap, you probably already have some. Downside: they clog your network, often require cloud connections, cheap ones have security issues. Fine to start. Not ideal at scale.
Zigbee — different wireless protocol, doesn’t use your WiFi, runs on its own mesh network where each device also helps relay signals from others. You need a coordinator dongle plugged into your Pi. Devices are cheap — Ikea Tradfri bulbs, Sonoff sensors, Aqara stuff. This is what most serious raspberry pi home automation setups use once they scale up beyond a handful of devices.
Z-Wave — similar to Zigbee but different frequency, more controlled certification process. Very reliable. Slightly fewer device options, slightly more expensive per device. Some people swear by it.
My recommendation: start with whatever WiFi devices you already own. Get comfortable. Then gradually add Zigbee devices as you expand. Don’t buy a bunch of new hardware before you even have the Pi running.
I spent $70 on Z-Wave sensors before I’d gotten my first automation working. Don’t do that.
Mistakes I Made — So You Don’t Have To
Building complex automations too early. I had a whole plan for a multi-condition presence detection system before I’d gotten basic light control working. It fell apart, frustrated me, and I almost quit. Start simple. One device, one automation. Get the win. Then build.
Ignoring the MicroSD failure risk. Already mentioned this. Run on an SSD. The card will fail. It’s when, not if.
Skipping backups for two months. Home Assistant has built-in backup. I thought “I’ll set that up later.” Later came and it wasn’t pretty. Set up automated backups in week one. Configure them to copy somewhere external — USB drive, network share, Google Drive. Home Assistant can do all of this natively.
Buying the wrong Zigbee coordinator. Got one with known Linux driver issues. Should’ve done five more minutes of research before ordering. Spent an evening trying to figure out why it wasn’t showing up before finding a forum post explaining the problem. Swapped it for the SONOFF Zigbee 3.0 USB Dongle Plus — community consensus recommendation — and it worked immediately.
Underestimating the documentation. Home Assistant’s official docs are decent but assume Linux familiarity not everyone has. Budget time for confusion. It’s not a you problem. It’s a learning curve.
What My Setup Actually Does After Six Months
Here’s something concrete to aim at.
When my wife or I arrive home, the porch light comes on if it’s after sunset. Thermostat adjusts to our preferred temperature. If neither of us is home after 10pm, lights in common areas automatically go off and the alarm system arms.
Morning: my alarm goes off, coffee maker turns on ten minutes later. My office lamp fades on slowly over two minutes — not a jarring switch — because I hate being blasted by light first thing.
We have a door sensor on the back gate. If it opens when neither of us has triggered a code or entered the geofence through another route, I get a notification.
The whole raspberry pi home automation system runs on a Pi in my utility closet next to the router. Basically invisible. Hasn’t gone down unexpectedly in about four months. Power consumption negligible.
Total hardware cost to get here: probably $180-220 spread over several months. Not counting the smart devices themselves that I was adding anyway.
Questions I Keep Getting Asked
Do I need to know how to code? Not really. Home Assistant has a visual automation editor that handles probably 80% of what most people want without writing a single line. When you hit the edges, you get into YAML configuration — which looks like code but is mostly formatted lists of settings. Basic comfort with copy-pasting from documentation and reading error messages is more useful than actual coding skill.
How long does it take to get running? First device connected and first automation working? A dedicated Saturday afternoon — maybe 4-5 hours including setup. Getting everything dialed in to feel polished and stable? A couple of months of weekend sessions. Not a one-day project for something robust, but the “this actually does something useful” milestone is reachable quickly.
Is it worth it vs SmartThings or Alexa? Depends what you care about. If convenience matters more than control, commercial options are genuinely fine and easier to start. If you care about automations not breaking when a company changes its API, your home data not going through someone else’s servers, and no subscription fees — the raspberry pi home automation approach is worth it. And if you enjoy tinkering, this is genuinely satisfying in a way a ready-made hub isn’t.
What’s the one thing you wish you’d known at the start? The community is the product. Home Assistant Reddit, the forums, YouTube channels like BeardedTinker and Everything Smart Home — those resources are what make this possible for a normal person without a networking background. Whatever you’re stuck on, someone has documented it. Bookmark r/homeassistant before you start.
Six Months In — Still Worth It
If you’re thinking about jumping into raspberry pi home automation — yeah, do it. But do it slowly. After six months I can say raspberry pi home automation is genuinely worth it if you enjoy tinkering and care about owning your own system.
Week one goal: get the Pi set up with Home Assistant, connect one device, get one automation working. That’s it. Not a full house. Not a presence detection system. Not voice control. One thing that actually works.
The whole point of raspberry pi home automation is that you build it incrementally — each piece making sense before you add the next one.
Once that works, you’ll understand the logic well enough to add more. The second device takes a fraction of the time the first did. By the time you’re on your tenth, you’ll be helping other people in forums the same way strangers helped you.
The rabbit hole is deep — my raspberry pi home automation setup has consumed more Saturday mornings than I’d probably admit to my wife. But the thing I’ve built actually works, it’s actually mine, and when I pull into my driveway and the porch light comes on automatically, I still get a small dumb thrill out of it every single time.
That’s probably worth something.
You Might Also Like
- Gaming PC Under $600: Honest 6-Month Review & Build Guide
- Best AI Avatar Tools for Multilingual Voiceovers (Real Review 2026)
- Affordable AI Recruiting Tools for Small Teams (Honest Review 2026)
- Beginner’s Guide to Mini RC Drift Cars (Real Experience After 3 Years)
- Home Automation Switches for Beginners (Honest 2026 Guide)
- Savant Home Automation Review: My Shocking Real Experience After 2 Months